Chapter 4 - What happened on Operations Burnham and Nova?
< Return to Contents | Previous | Next >
What happened on Operations Burnham and Nova?
- The principal purpose of this chapter is to set out what happened on Operations Burnham and Nova. This is relevant to several aspects of our Terms of Reference. One of the purposes of the Inquiry is to “Seek to establish the facts in connection with the allegations of wrongdoing on the part of NZDF personnel during the Operations”.1 We are to examine, in particular, the conduct of the New Zealand Defence Force (NZDF) forces during Operations Burnham and Nova.2 Our objective at this stage is simply to set out the sequence of events, leaving questions relating to casualties and the extent of damage to property until chapter 5, and our assessment of the knowledge and conduct of NZDF personnel during the operations until chapter 6.
- However, following our outline of what happened on Operation Burnham, we will also address in this chapter two issues which arise out of the operation and are important to the discussion in later chapters. These are:
- The interactions between the Joint Tactical Air Controller (JTAC) and the air assets in the course of Operation Burnham. We will describe these interactions in the course of the factual narrative, but will make some brief general observations about their nature at the conclusion of the relevant section.
- Whether Operation Burnham can accurately be described as an operation led by the Afghan Crisis Response Unit (CRU), supported by Task Force 81 (TF81).
- We deal with each operation in turn.
- The following account of what happened on Operation Burnham is drawn from various sources, including:
- Contemporaneous video footage made available to the Inquiry on a confidential basis. The Inquiry has had access to weapons system video from the two AH-64 Apache attack helicopters, part of which United States authorities have now cleared for public disclosure, and video footage from a drone which overflew the area during and after the operation. The weapons video is edited, but the drone video footage is not. The editing of the weapons video was, according to a subsequent investigation by United States military authorities, carried out in accordance with standard operating procedures.3 The Inquiry has also had access to some video footage and accompanying audio from the AC-130 Spectre gunship.
- A transcript of the audio from the Apache weapons video, which records some of the communications between the JTAC and the United States air assets.
- Reports of two investigations carried out after the operation, one by the International Security Assistance Force (ISAF) Incident Assessment Team and another by an investigating officer of the United States Army (the AR 15-6 Report). The AR 15-6 Report, a redacted version of which has been cleared for public release by United States authorities, contains accounts of the operation given by United States air crew, and a short transcript and three still images from portions of video footage, most of which was available to the Inquiry.4
- NZDF reports and correspondence from immediately after the operation until this Inquiry was announced.
- The account in Hit & Run.
- Evidence given to the Inquiry by those involved in the operation.
- Accounts given by Afghan villagers and other people with knowledge of events at issue in statements to lawyers in Afghanistan engaged by the Inquiry, interviews with Mr Jon Stephenson and affidavits prepared for a judicial review proceeding in 2017.
- Contemporaneous reports in news media and by human rights and similar organisations.
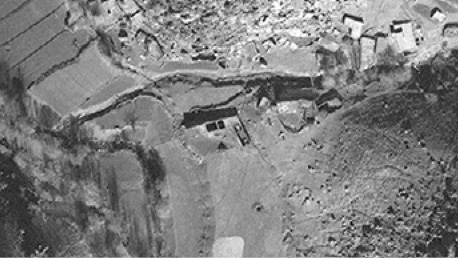
- We also received assistance from our expert military adviser and from an independent imagery and geospatial analyst, who conducted an analysis of the Apache weapons video and the drone footage. To assist understanding, we have included at the end of this chapter images of the area with the important locations marked (Figure 4). We have also included images of the three target buildings, which NZDF designated as A1, A2 and A3, both before and after the operation (it will be recalled that A1 and A2 belonged to Abdullah Kalta and A3 to Maulawi Neimatullah) (Figures 5 and 6). For ease of reference, there is a timeline at the conclusion of the chapter.
Ground forces and their operational tasks
- The planning for Operation Burnham provided that the ground force would comprise five distinct groups:
- A command (or overwatch) group. This consisted of the Ground Force Commander; a communications element, which included the JTAC; and two marksmen.5 The Ground Force Commander had overall command of the ground force and, through the JTAC, cleared the activities of the air assets.
- A security detail to protect the helicopter landing zone. This consisted of members of the CRU and their embedded TF81 trainers. There was also a medic positioned with the security detail, who could be called forward if needed.
- An assault force. This included the Troop Commander and two assault groups comprising members of TF81. The assault force was tasked with entering, clearing and securing A1, A2 and A3, and detaining the targets if they were present.6
- An exploit and Explosive Ordnance Destruction (EOD) group. This included a specialist search team whose role was to search A1, A2 and A3, and personnel trained to dispose of any captured weapons and ammunition by controlled detonation.7
- An aerial response force. This involved marksmen and CRU personnel flying above the ground troops in a UH-60 Blackhawk helicopter in case the ground force required assistance.
- The joint force of TF81 personnel and members of the CRU left Kabul on two CH-47 Chinook helicopters at 10.17pm on 21 August 2010 and flew to Bagram Airfield where they arrived at 10.50pm. There were also two Blackhawk helicopters, one carrying the command group and the other the aerial response force. The two Apache helicopters left Bagram Airfield at 11.11pm and arrived over Tirgiran Valley at 12.22am to carry out a visual inspection of the proposed landing zone for the Chinooks. Just before midnight, the drone took position over the villages and began its video feed, which continued until 7.30am on 22 August 2010. The video feed went live to TF81’s base in Kabul. The JTAC was able to communicate with the drone operator, although direct communications were patchy and some messages had to be relayed through the AC-130 Spectre gunship.
- After the Apaches and the AC-130 had checked the landing site, the first Chinook landed at 12.30am and the members of the ground force aboard disembarked, including TF81 and CRU personnel. The landing zone was approximately 140 metres north of Khak Khuday Dad. After disembarking its passengers, the Chinook lifted off again. While there was an almost full moon that night,8 it was very dark on the valley floor. The TF81 personnel had night vision goggles, but the CRU members did not. The assault force immediately began to move southeast along the valley beside a stream to A1 (Kalta’s compound), which was about 400 metres away. They went past Khak Khuday Dad and as they went along the valley, there was to their right (that is, to the southwest) a thick line of trees and vegetation. The CRU members and their embedded TF81 trainers formed a security party at the helicopter landing zone.
- Within a minute or so of the first Chinook landing, the pilots in one of the Apache helicopters saw a group of people close to two buildings in Khak Khuday Dad, about 250 metres across the valley from A1. Analysis of the video footage suggests this group consisted of seven people: five males and two probable females. There is no indication that the air crew were aware there may have been females in the group, nor was that communicated to the JTAC or Ground Force Commander. Some of the men were seen exiting one of the buildings carrying several weapons, including a rocket-propelled grenade (RPG) launcher with a bipod deployed and two or three long arm weapons.9 NZDF described this building as the “cache house” in its public presentation at the public hearing for Module 1,10 while Mr Hager has referred to it as Abdul Ghafar’s house.11 We will use the term “cache house” simply because it is the building from which weapons were observed being removed.
- Initially, the Apaches had some difficulty contacting the JTAC to obtain clearance to engage the armed men. At this stage, the Blackhawk helicopter carrying the Ground Force Commander and the JTAC had not yet landed—its designated landing place had turned out to be unsuitable, so the pilot was looking for an alternative. However, after a few minutes, the Apache crew were able to make contact with the Blackhawk carrying the Ground Force Commander and advised that they had positively identified five individuals with weapons manoeuvring towards the landing zone.12 The Ground Force Commander gave clearance to engage the five individuals if they were moving tactically around the area.
- There was no immediate engagement, however. The assault force was by this stage moving down towards A1 in single file alongside the thick line of trees running along the southwestern side of the valley. The Apache helicopters saw two men on the other side of the tree line (at the base of the ridge) as the assault force was passing. They identified the two men as armed insurgents but did not seek clearance to fire on them given their close proximity to the assault force. At least two members of the assault force saw movement on the other side of the tree line and walked over to take a look. They decided not to take action as they could not determine whether the individuals were armed, and instead re-joined the file of soldiers heading towards A1.13
- The Apaches then turned their attention back to the cache house. At 12.37am, they observed two men removing objects from the building. One man was carrying what appears to be a bag (possibly containing munitions or other similar equipment, although that cannot be verified), which he handed to another man; the second man was carrying some form of long arm weapon. In addition, two further men were near the doorway, one of whom appears to have been carrying a long arm weapon. Two women and three children are also visible on the video footage taken by the Apaches, exiting the cache building and entering the neighbouring building to the southeast. There is no indication that either the crews of the Apaches or any TF81 personnel were aware of the presence of women and children at that time.
- At about the same time, the security detail at the landing zone saw six individuals they identified as civilians at a building just to the north.14 Four went off along a track to the north (including an older man, who re-appeared at a later stage), but two women remained. Some CRU personnel went over and told them to stay in the building.
- Around 12.41am, the assault force was approaching A1. By this stage, the command group had managed to disembark from the Blackhawk helicopter on the ridge west of A3 overlooking the valleys. The place where they disembarked was some distance away to the south from where the command group was supposed to be.15 As a result, after leaving the helicopter, the group went as rapidly as possible along the ridge in the direction of the intended overwatch position. As they were going along the ridge, one of the Apache helicopters sought clearance to engage two people who were part way up the ridge behind the cache house. The JTAC was advised that the men were now up on high ground, that they had been positively identified with weapons and that collateral damage was not an issue.16 After conferring with the Ground Force Commander, the JTAC told the Apache crews that they were cleared to engage if weapons were confirmed and the targets were clear of friendly forces and collateral damage issues. This was at 12.48am, just as the second Chinook was landing (at the same helicopter landing zone as the first) to drop off the remainder of the ground force. It had approached the landing zone earlier but had been warned off by the Apaches because they were concerned about the men they had seen carrying weapons close to the landing zone.
- Between 12.54am and 1am the Apaches were involved in three engagements with around six men they identified as insurgents on the ridge above Khak Khuday Dad, and the AC-130 in an additional one.17 Three of these four engagements occurred on the eastern side of the ridge and one on the western side. Following the Ground Force Commander’s initial clearance to engage, the JTAC provided clearance for each subsequent engagement based on information from the air assets that they were pursuing “enemy movers”. Video footage of the engagements shows that at least one target was killed, and others may have been killed or wounded. Our imagery and geospatial analyst considered that at least two of the men engaged were probably carrying long arm weapons.
- At 1.05am, the Apaches engaged a man coming down the ridge approximately 20 metres south of the building beside the cache house. This man appears from the video to have been injured and unarmed. The Apaches sought clearance to engage, advising the JTAC that the man was an “enemy mover” and that he had a weapon; they did not advise that he was injured. On receiving clearance, the Apaches fired on the man but did not hit him. The rounds fell to the south of the man and the buildings.
- At this point, one of the pilots informed the JTAC that a group of people was standing next to a building approximately 200 metres from the ground patrol, and that at least one was female. The JTAC “copied” but said nothing further.18 On the video footage, this group is visible outside the building neighbouring the cache house on the southeastern side. The group appears to include two women and two children. This is the same building into which women and children could be seen entering at 12.37am. The JTAC was not informed of the exact location of the group or of their proximity to the man being targeted by the Apaches.
- When Counsel Assisting the Inquiry questioned the JTAC about this exchange with the Apache pilot, he said he had no recollection of being told about the huddled group or the presence of a female and was unaware that the target was near buildings. He said if he had been aware of this, he would have asked for more information about whether the engagement was necessary. We are satisfied that although the JTAC did say he “copied”, he did not appreciate the true nature of the situation—that is, that the target of the engagement was near buildings and a group of people that included at least one female. There were difficulties with the communication links between the air assets and the JTAC at various times throughout the operation, so the JTAC may not have been able to hear all of what the Apache pilot attempted to communicate to him.
- The apparently injured man continued to move north toward the buildings and the group. The Apaches fired at him twice more, missing him but impacting on the roofs of the cache house and the neighbouring building.19 When interviewed as part of the AR 15-6 investigation, the crews of the Apaches and AC-130 said they were not aware of the impact at the time,20 and the JTAC was not informed of it. As we discuss in subsequent chapters, the impact was later assessed to have resulted from problems with weapon accuracy.21 We are satisfied that the JTAC and Ground Force Commander had no knowledge of these weapon problems during the operation. The air crew do appear to have observed people outside the building neighbouring the cache house after the impact.22 The Apaches ceased firing at this stage because the man had moved too close to the buildings and the group of people.23
- Before these engagements occurred, the assault force had reached A1. The interpreter who was with the Troop Commander did a call out, using a loud hailer. The effect of the call out was to tell the insurgents that Afghan National Security Forces were outside and that there was no escape, so they should come out, or let their women and children come out so that they would be safe. This provided an opportunity for anyone inside the building who wished to exit peacefully to do so. When no response was received, the assault group which was to enter the building24 prepared to place an explosive charge on the building’s western wall to breach it so that they could gain entry.25 (Like other houses in the vicinity, A1’s walls were made of stone.) The team leader of the group looked through a window to see whether anyone was in the immediate vicinity of the intended breach. He saw no one, so the charge was placed, the personnel involved withdrew to a safe place and the charge was detonated. The wall was breached at 12.53am.
- When the team leader went to climb into the building through the partially breached wall, using the windowsill as leverage, the wall collapsed on top of him, causing him severe injuries. Another member of the assault group suffered minor injuries in the collapse. A further breach was made on the southern wall of A1 and entry was obtained through that. The soldiers entering the house let off at least one flashbang26 before searching the house for occupants. The house turned out to be empty, although it showed signs of recent occupation. The exploit team found arms and ammunition in the building: an RPG launcher and its components (explosive warheads and rockets), a bipod, a pistol holster and various types of ammunition, including ammunition for light/medium and heavy machine guns.27
- Obviously, some re-organisation of the operation had to be undertaken as a result of the serious injuries suffered by the team leader of the assault group. At 1.26am the Blackhawk helicopter carrying the aerial response force landed and the force disembarked to act as a reserve at A1 while the assault force went to A3. In addition, the medic who had remained at the helicopter landing zone went forward to A1 to look after the injured team leader (who was not evacuated by helicopter until around 2.30am).
- A2, a building around 20 metres to the east of A1, was also cleared by the assault force. It was empty and did not appear to have been occupied. There were indications that it had been used as an agricultural building.
- While this was happening, at 12.59am the JTAC was advised by one of the air assets that a “mover” from the earlier engagements near the cache house was climbing up the ridge behind Khak Khuday Dad towards the overwatch position. The Ground Force Commander gave evidence that he was also told by someone at base camp in Kabul, where TF81 personnel were watching the live drone feed, that an “insurgent” was approaching. The man was being tracked by the drone and another air asset. The Ground Force Commander’s understanding was that he had come from the same area where people had been seen with weapons earlier.28 The Ground Force Commander ordered the marksmen who were with the command group to look for him and, once he came into view, to keep him under watch. Only one of the marksmen was able to see the man through the night sight on his weapon. Because of the rocky nature of the terrain and the difficult lighting conditions, the marksman could only spot the man briefly every 50 metres or so, and was unable to determine whether the man was armed.
- Ultimately, when the man was within 50 metres of the overwatch position—about 20 minutes after the JTAC was first informed that the man was approaching—the Ground Force Commander ordered the marksman to shoot. At around 1.21am, the marksman fired two shots. The first struck the man and he immediately disappeared. The second shot hit a rock. The AC-130 air crew observed the man rolling down the side of the ridge and then ceasing movement, and informed the JTAC accordingly. The two marksmen went down to where the man had fallen to check on him. After searching for some time on what was a very rocky side of the ridge, they found his body. He had fallen about 20 to 30 metres down the side of the ridge. The marksmen checked the man and determined that he was dead. They said he appeared to be somewhere around 45 to 50 years of age and was bearded and ragged looking, as if he had been sleeping rough. He had a small pocket knife and a torch in his pockets. The marksmen looked about for a weapon but found nothing.29
- A minute or so after the marksman had shot the man, the Apaches engaged three men who were walking along a track on the valley floor about 700 metres to the south of A3. They were moving toward the south (that is, away from the ground force). One of the men had stopped and was crouching among the shrubs.30 The other two men were walking in single file, with a gap of several metres between them. One had a long arm weapon slung across his back. The helicopters engaged the men, killing at least the armed man and possibly also the man walking in front of him, although it is more likely that the latter walked on a little further before being killed. We discuss this in more detail in chapter 5. No clearance was sought from the JTAC before this engagement, which, we were told, led the JTAC to remind the helicopter crews that they should get clearance before engaging.
- After they had finished at A1 and A2, the assault force moved on to A3. It was about 320 metres away to the south. The men arrived at the house around 1.45am. They attempted an explosive entry at the northern wall, but when the charge failed to breach the wall, they entered through the front door. This involved shooting the hinges and lock off the door with a shotgun (which fired cartridges containing a single slug rather than pellets) and then entering.31 Again, the assault force let off flashbangs before entering the rooms in the house. They found no-one, but there were signs that the occupants had made a hasty exit—there was hot food and drink, and a cooking fire was still burning.
- For reasons we explain later,32 we consider there is little doubt that Maulawi Neimatullah and Qari Miraj, two of the insurgent leaders involved in the attack that killed Lieutenant O’Donnell, were staying at A3 with their bodyguards that night, although they were somewhere else nearby when the helicopters arrived. They fled to the south when they heard the approaching helicopters. Miraj stopped at the house on his way to warn Neimatullah’s father and brother, who then set off to the south with him.
- By 2.10am, A3 and a small building to the south of it had been cleared. An AK-47 was found in A3.33
- Shortly after the assault force arrived at A3, the drone began tracking a group of people who were travelling north along a different valley to the southeast of A3. They were moving towards a village located about 500 metres to the south of A3, where the two valleys intersected. When they reached the village, several other people joined the group and they all left towards the south (eight people in total), travelling along the same valley in which A3 was located but away from it. The group passed the location where the three men had been engaged earlier, around 700 metres south of A3. They stopped there for a few minutes, perhaps looking at the body of the man who had been carrying a weapon. The group then continued along the track but appeared to be panicked by something (possibly the sound of aircraft) and scattered, before re-grouping and seeking shelter under a rocky outcrop. The group then began to climb the ridge on the eastern side of the valley, breaking into smaller groups as they went. By this stage, they were about a kilometre to the south of A3.
- Around this time the assault force was preparing to leave A3. The air assets were reporting to the JTAC that there were insurgents to the south of A3 who were climbing up to high ground. This was being passed on to the Ground Force Commander, who was with the JTAC at the overwatch position, and to the Troop Commander on the valley floor at A3. Some members of the assault force at A3 took up position just south of A3 to provide security against a possible enemy incursion from the south.34 Further north, troops were also stationed up behind A1 to watch for any insurgents approaching from the east on the high ground above A1. As we discuss further in chapter 6, although the group of people climbing the ridge was in fact about a kilometre south of A3, the Ground Force Commander understood them to be significantly closer and moving in a direction that would take them above ground troops.35
- The Ground Force Commander was concerned that the group would attempt to shoot down helicopters once they gained the high ground. The JTAC said in his evidence that the group was climbing towards the air corridor for the helicopters and could threaten the extraction of the ground force. He referred to the intelligence they had received before the operation indicating insurgents in the area had access to heavy machine guns,36 which experience suggested would be kept on ridgelines for use against aircraft. He also said the Apaches had made a number of low warning passes over the group, but they continued to climb in an organised formation.
- Shortly before 2.30am, as the assault force was leaving A3, the Troop Commander noticed through the open front door that a fire, about the size of a small campfire, was burning (he had remained outside the building in an oversight role).37 He advised the Ground Force Commander of the fire but was told he did not need to do anything about it. As the operation continued, the fire in A3 became more intense, so that ultimately, two rooms on the south end of the house were burnt out.38 According to Hit & Run, one of the rooms contained religious books, which were destroyed in the fire.39
- By 2.31am the assault force was moving back to A1. Meanwhile, back at A1 the EOD team stacked the munitions40 that had been found in the building in a pile on the ground outside, close to the wall.41 The pile was then destroyed by a controlled detonation. This detonation had two results:
- First, a number of small fires started in the vicinity as a result of pieces of hot munitions falling in dry grass and other vegetation. This was referred to by witnesses and is clearly visible in the drone footage.
- Second, a section of the walls and roof of A1 collapsed adjacent to where the munitions pile was detonated. While not all witnesses agreed that this had happened, the collapsed section is clearly visible on the drone footage, and, given the timing, must have resulted from the explosive destruction of the weapons.
- Around the same time the munitions were destroyed, the Troop Commander was informed that some villagers were approaching from the houses to the east of A1.42 He sent the interpreter to talk to them. The interpreter also made a call out using a loudhailer, informing villagers that the operation was conducted by Afghan National Security Forces to target insurgents and apologising for the disturbance. A similar message was also conveyed through posters left behind by troops.43
- At 2.52am, the Apaches and the AC-130 were cleared to engage the people climbing up the side of the ridge a little over a kilometre to the south of A3. As part of this engagement, the AC-130 fired a number of 40mm and 105mm rounds and one of the Apaches fired a Hellfire missile. The AC-130 reported that four people were killed in this engagement.44
- An operational summary document prepared by the Ground Force Commander immediately after the operation indicates he thought the group targeted in this engagement was moving towards ground troops rather than away from them.45 It was clear from the JTAC’s evidence to the Inquiry, however, that the JTAC knew the targets had gathered in the village to the south of A3 and had moved further south before climbing the ridge. In any case, once the firing began it would have been visible from the command group’s location, as was confirmed in oral evidence.
- Between about 3am and 3.30am, the assault force left A1 and moved back to the landing zone to be picked up. During the return to the landing zone, one of the CRU members lost his pistol and it could not be found.46 By 3.45am, all the ground forces had been extracted and, after refuelling in Bamyan, they arrived back at their Kabul headquarters shortly after 5am. At some stage after troops left A1, it caught fire. This is visible on the drone footage by 3.58am.
- No battle damage assessment was undertaken on the ground in the areas where the air asset engagements occurred (although the drone continued its surveillance of the villages for several hours). The Ground Force Commander considered that attempting to conduct a battle damage assessment would have created an unnecessary risk to troops, given the earlier presence of armed individuals in the area, and in the case of the engagement to the far south, would have been impossible, bearing in mind that troops were preparing to be evacuated by helicopter and time was limited.47 However, other usual post-operation assessment and reporting processes took place. For example, when TF81 returned to base, there was a “hot wash”, which is a debriefing held immediately after an operation where issues about the operation can be raised.
- The Minister of Defence at the time, Hon Dr Wayne Mapp, told us that after the operation his sense was that the Chief of Defence Force and other senior officers were a bit “flat”. Although the operation was seen as a success in terms of disrupting the insurgent networks, neither of the main objectives of the operation, Kalta and Neimatullah, had been arrested and detained. Later, Dr Mapp described the operation to a friend as a “fiasco”, a remark that he confirmed publicly he had made.48 When we asked Dr Mapp about this, he said that all he meant was that the operation had failed to achieve what it set out to achieve. He acknowledged that his language is sometimes a little “flamboyant”.
Interactions between the JTAC and the air assets
- In the course of the foregoing narrative, we have referred to the interactions between the JTAC and the air assets. Those interactions are fundamental to our consideration of at least one of the matters which the Terms of Reference direct us to consider, namely NZDF’s compliance with the rules of engagement and International Humanitarian Law.49 This is a matter to which we will return in chapter 6. For present purposes, it is sufficient to make two comments.
- First, although Operation Burnham was an ISAF operation to which ISAF’s rules of engagement applied, the individual force elements involved (relevantly, TF81 and the United States air assets) were each governed by their own national rules of engagement. Accordingly, the ultimate question for the air assets was whether the engagements they entered into complied with their national rules of engagement. That was a decision which they had to make. Whether or not they were compliant is not something that we have jurisdiction to assess. We do note, however, that the AR 15-6 investigation carried out by United States forces into the operation concluded that the engagements were compliant with the relevant United States rules of engagement and with the Tactical Directive:50
The IAT [Incident Assessment Team] executive summary stated that all engagements appeared to be in accordance with appropriate ROE and the Tactical Directive … This investigation concurs with the IAT’s findings.
- Second, much of the commentary on Operation Burnham has described the JTAC’s role as being to “call in” or “direct” fire from the air assets. On some operations, a JTAC may do precisely that; for example, a JTAC may direct air assets to target a particular building or group of people presenting a threat to the operation or to ISAF personnel. As we said earlier,51 during Operation Burnham neither the Ground Force Commander nor the JTAC could see the situation on the ground. They could not see where people who had exited buildings in Khak Khuday Dad were; whether they were carrying weapons; whether they were in close proximity to obvious civilians such as women and children; and so on. They had to rely on what was relayed to them by the crew of the air assets (including the drone operator), ground troops and TF81 personnel at Camp Warehouse. In general, rather than directing or calling in fire, the Ground Force Commander and the JTAC cleared the air assets to engage, sometimes conditionally, based on the advice they were given. As we explain in chapter 6, however, the final engagement was of a slightly different character.52 While the air assets were still “cleared” to engage rather than directed to, unlike in the previous engagements the Ground Force Commander declared the targets hostile before the engagement.
A CRU-led operation?
- Operation Burnham has been referred to in a way that indicates it was a “CRU-led” operation on a number of occasions, particularly in advice to ministers. For example:
- NZDF’s written briefing to the Minister of Defence dated 10 December 2010, three and a half months after the operation, noted the attack on the New Zealand Provincial Reconstruction Team (NZPRT) patrol on 3 August 2010 and stated that “… the CRU, supported by the New Zealand Special Air Service (NZSAS), developed an operation plan targeting the insurgent leadership …”53
- Similarly, the Ministerial briefing of 13 December 2010, which was prepared on the basis that it might be publicly released, noted the 3 August attack and said:54
Following this attack, the Afghan Ministry of Interior (MOI) Crisis Response Unit (CRU) supported by the NZSAS Task Force and other ISAF coalition partners, commenced planning to disrupt this insurgent group’s capacity and capability to target coalition forces, including the NZPRT within the Baghlan-Bamian border region.
- The Vice Chief of Defence Force’s talking points for an oral briefing to the Prime Minister on 23 March 2017 stated:55
In the wake of the [3 August attack] Afghan MOI’s CRU supported by SAS and coalition partners started gathering intelligence and planning to disrupt this insurgent group that posed a threat to the NZ PRT within the Baghlan–Bamian border area.
This was consistent with the way partnered operations were generally described. For example, a document prepared by the Ministry of Foreign Affairs and Trade dated 2 September 2010 refers to partnered operations as “CRU-led”.56 We discuss this further in chapters 10 and 11 where we discuss detention issues.
- In our view, this characterisation of Operation Burnham as a CRU-led operation, supported by NZSAS, was misleading and likely to result in misunderstandings on the part of ministers and the public. We say this for four reasons:
- First, as we outlined in chapter 3, although Operation Burnham was an ISAF operation with all the requirements and disciplines that such operations involved, the push for an operation into Tirgiran Valley came from the New Zealand forces. While the insurgents from that region posed a threat for Afghan authorities and the general population in Bamyan province, they posed a serious and immediate threat to the security of the NZPRT, as they had recently demonstrated. It was NZDF’s desire to deal with that immediate threat that drove the operation.
- Second, in reality the CRU was not sufficiently equipped or experienced either to plan or to execute an operation of the complexity of Operation Burnham. For example, the CRU personnel on Operation Burnham did not even have working night vision goggles. Nor did they have the operational skills to undertake an operation of that type. This is presumably the reason that their primary tasks were to guard the helicopter landing zone and to be part of the aerial response team, which was a reserve emergency force. The statement of the TF81 group commander of a helicopter landing zone security group, which included CRU personnel, provides some insight into their level of experience.57 During the operation one of the CRU members fired a round at an unarmed man (but did not hit him). The group commander instructed him to stop shooting. The group commander’s statement says “[i]t must be understood that to that time there had been a lot of support fire coming into the area and the [CRU] pers were young and had not been exposed to this type of situation before …” This is, however, not to say that the CRU had no real role to perform on the operation. Apart from protecting the helicopter landing zone, some CRU personnel did go to A1, and events could have developed in a way that required them to play a more active role, for example if significant interactions with the local people became necessary for some reason.
- Third, the General in charge of the CRU was not even briefed on the operation until 19 August 2010, two days before it took place.58 Clearly, he and his staff would have had little opportunity to participate in the planning of the operation, which was by that stage well advanced. Indeed, the concept of operations specifically stated that the CRU’s involvement in planning the operation was “low”.59
- Fourth, Sir Jerry Mateparae (the Chief of Defence Force at the time of the operation) seemed to accept in evidence before the Inquiry that NZDF led the operation.60 NZDF has also stated in its unclassified account of events for the Inquiry that the operation was a national task approved by the Chief of Defence Force.61
- We accept that Afghan authorities were involved in the operation to some extent. For example, the Afghan Ministry of Interior approved the operation and facilitated the issuing of arrest warrants for Kalta and Neimatullah on about 16 August 2010.62 In addition, CRU personnel were present during the operation, albeit largely in a passive role, although they could have become more involved if matters had developed differently. But to suggest that the CRU planned or led the operation, or were even involved in the planning or leading of the operation in a meaningful way, is inaccurate and misleading.
- As we have said, the return operation to the villages took place almost six weeks after Operation Burnham, in the early hours of 3 October 2010.63 The allegation that it was a revenge raid and that houses were “wrecked”64 is not borne out by the information to which the Inquiry has had access.
- After a slight delay due to aircraft availability, the ground force landed at approximately 2am at the landing zone halfway between A1 and A3. Part of the ground force went northwards along the valley towards A1. While the intention was that they would secure the area between A1 and A3 and only enter and search A1 and A2 if necessary, they did in fact enter and search both buildings. A1 and A2 were not locked and were clearly unoccupied. They were entered and searched without the use of explosives or a shotgun and did not appear to have been occupied since Operation Burnham.
- The other part of the ground force entered and searched A3. Neither group found any items of interest or any people in any of the three buildings. They then searched the tree line to the west of the valley between A1 and A3 looking for possible tents which had been spotted on earlier drone footage, but none were found. Both groups returned to the helicopter landing zone and left the valley by helicopter at approximately 3am. During their time on the ground, the ground forces did not see or engage with anyone, nor did the supporting air assets.
- The entrance to A3 sustained some damage during the operation when it was breached. However, this damage was not significant, and photographs from the operation show a rudimentary door hanging off a rope hinge.65 Video footage shot on the operation by TF81 personnel has also been made available to the Inquiry and does not show any other damage caused to A3. The damage caused by the fire on Operation Burnham was still evident, although it had been repaired.
- The statement in Hit & Run66 that the houses were more damaged in this operation than they were in Operation Burnham is not supported by other information. Commercially available satellite imagery from 11 November 2010 shows that the only discernible damage to either building that was not visible on the drone footage immediately following Operation Burnham was a collapsed roof on the short side of the “L” at the eastern end of A1.67 On the basis of evidence available to us, we are satisfied that this damage did not occur on Operation Nova. The cause of the damage is unclear but it is likely that the structural damage the building sustained during Operation Burnham was a contributing factor to the roof collapsing.
- Although the operation was stated to be a deliberate detention operation in relation to Maulawi Neimatullah,68 it is not clear whether the TF81 leadership considered it likely that he would be captured. It may be that the primary purpose of the operation was not so much to capture Neimatullah but rather to maintain pressure on the insurgent group and to signal to them that Tirgiran Valley was not a safe haven. We say this because the intelligence that Neimatullah would be present on the night was somewhat ambiguous, and the sources available to us suggest that an important purpose of the operation was to make a point so as to reduce the threat to the NZPRT in Bamyan by forcing the insurgents to leave the Tala wa Barfak District. The operation was successful in this respect. Intelligence reporting indicated that, following the operation, locals put pressure on the insurgent leaders to leave the district.69 Shortly after, Kalta and Neimatullah went to Pakistan.
- Before leaving this description of the operations, we should make three points:
- First, several media stories immediately after Operation Burnham stated that prisoners had been taken in the operation. The District Governor of Tala wa Barfak, Mohammad Ismail, was reported in one story as saying that four people were arrested; in another he was reported as saying that nine people were arrested.70 In fact, no one was arrested during the operation.
- Second, Hit & Run claims that besides searching A1, A2 and A3, teams of TF81 and CRU personnel conducted “house-to-house” searches in Naik.71 It says that one team searched five houses and another about 10 houses.72 In fact, the only buildings searched in the operation were A1, A2 and A3, and A2 was an agricultural building.
- Finally, Hit & Run records the account of Din Mohammad, one of those said to have been injured in the operation. He said that he was staying with his family in three tents about 250 metres from the helicopter landing zone. He said that when the helicopter landed, their stock ran away and their tents were blown over. The adults took the children to holes in the ground to hide.73 He said he was injured as a result of flying shrapnel. However, there is no support for this account in the video footage. Further, villagers interviewed by the lawyers who assisted the Inquiry in Kabul said that Din Mohammad was staying at Abdul Razaq’s house on the night of the operation. As we explain in chapter 5, it is likely this was the cache house.74
Operation Burnham
The operation’s sequence of events
Operation Nova
Concluding comment
Figure 4:
Key locations in Tirgiran Valley

Satellite image dated 25 April 2010, source: Digital Globe
Figure 5:
A1 and A2 before and after Operations Burnham and Nova

Before (satellite image dated 25 April 2010, source: Digital Globe)
After (satellite image dated 11 November 2010, source: Digital Globe)
Figure 6:
A3 before and after Operations Burnham and Nova

Before (satellite image dated 25 April 2010, source: Digital Globe)
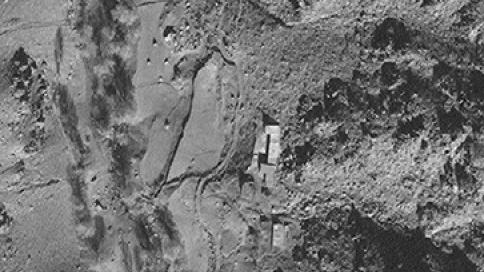
After (satellite image dated 11 November 2010, source: Digital Globe)75
Timeline of key events during Operation Burnham 22 August 2010
12.22 am
Two US Apache AH-64 helicopters arrive in Tirgiran Valley. An AC-130 Spectre gunship arrives shortly afterward.
12.30 am
First Chinook helicopter carrying part of the ground force lands about 140 metres north of Khak Khuday Dad village. Assault force begins moving southeast toward A1 and A2 (buildings associated with Abdullah Kalta).
12.31 am
One of the Apaches observes a group of people removing weapons from a building in Khak Khuday Dad (the cache house).
12.41 am
Assault force approaching A1. Command group has disembarked from a Blackhawk helicopter on the ridge to the west side of the valley.
12.48 am
Second Chinook lands and the remainder of the ground force disembarks.
Apaches seek clearance to engage men who have moved to high ground behind Khak Khuday Dad. Ground Force Commander grants clearance on the basis that weapons are confirmed and the men are clear of friendly forces and collateral damage issues.
12.53 am
Assault force breaches wall of A1 by explosive charge. Wall collapses on entry, injuring an assault group leader. Assault force makes a second breach and enters, finding weapons and ammunition but no people present.
12.54–1.00 am
Apaches and AC-130 engage around six men identified as insurgents on the ridge above Khak Khuday Dad. At least one is killed.
1.05 am
Apaches engage a man retreating from the ridge toward a building next to the cache house. A group of people including women and children are huddled beside the building. Women and children also entered the building earlier. Fire from the Apaches impacts the roofs of the building and the cache house.
1.21 am
A marksman with the command group shoots and kills a man approaching the overwatch position. He is within 50 metres of the command group and is understood to have come from the area where men were seen with weapons.
1.22 am
Apaches engage three men walking south around 700 metres south of A3. One, who is carrying a long arm weapon, is killed.
1.26 am
Aerial response force lands at A1 and remains there while the assault force moves south to A3 (a building associated with Maulawi Neimatullah).
1.45 am
Assault force arrives at A3. No people are inside but an AK-47 is found.
Drone begins tracking a group of people gathering south of A3.
2.30 am
Troop Commander at A3 notices a fire burning inside. He informs the Ground Force Commander and is told he does not need to do anything.
Injured soldier evacuated by helicopter.
2.31 am
Assault force moving back to A1.
Weapons and munitions found are stacked outside A1 and destroyed in a controlled detonation. A section of the walls and roof of A1 collapse.
2.52 am
Apaches and AC-130 cleared to engage a group of eight people climbing a hill over a kilometre south of A3. Four people are killed.
3.00–3.30 am
Troops depart A1 and move back to the landing zone for extraction.
3.45 am
All ground troops have been extracted by helicopter.
3.58 am
Drone footage shows a fire has started in A1.
1 Terms of Reference: Government Inquiry into Operation Burnham and related matters (11 April 2018), cl 6.1.
2 Clause 7.1 and 7.3.
3 Headquarters United States Forces—Afghanistan “Findings and Recommendations” at 1, AR 15-6 Investigation—Tigiran Village (30 September 2010) (Inquiry doc: United States Government FOIA release) at 6.
5 We use the term “marksman” as opposed to the term “sniper” used in Hit & Run. The terms have different meanings in a military setting. Unlike snipers, who often act independently, marksmen normally operate as part of a fire team. Marksmen are also usually issued with automatic or semi-automatic weapons instead of the bolt-action rifles generally used by snipers (see, for example, Slobodan Lekic “German gunmaker starts deliveries of US Army’s new squad marksman rifles” Stars and Stripes (online ed, 10 April 2020) <www.stripes.com>). The two men with the command group during Operation Burnham are more accurately described as marksmen than snipers.
6 OP RAHBARI ORDERS (Inquiry doc 09/39) at 38–39; Accompanies OP RAHBARI ORDERS (Inquiry doc 09/38) at 28 and 36. See chapter 10 at [7]–[12] for references to the contemporaneous documents on the issue of detention.
8 The moon had been up since before dark and set around 3am on 22 August 2010.
9 The term “long arm weapon” encompasses a variety of long, two-handed firearms that are designed to be braced against the shoulder when firing, such as hunting and assault rifles. Our imagery and geospatial analyst used the term when he was unable to determine from the imagery exactly what type of firearm was involved.
10 Colonel Grant Motley “Location and events of Operation Burnham” (Public Hearing Module 1, 4 April 2019); Evidence of Colonel Grant Motley, Transcript of Proceedings, Public Hearing Module 1 (4 April 2019) at 103.
11 Boris Jancic “Secret video of Kiwi soldiers’ attack on Afghan village released” The New Zealand Herald (online ed, 28 June 2019) <www.nzherald.co.nz>. Abdul Ghafar was an insurgent leader.
12 The men can be seen on the Apache footage moving towards the southeast, away from the main landing zone. The Apache crew may have been referring to the command group’s intended landing zone, which was in the general direction that the men were heading.
13 The men on the other side of the tree line would, presumably, not have had night vision goggles, so may not have been aware that the assault force was passing.
14 S50 HLZ STATEMENT OBJ BURNHAM (24 August 2010) (Inquiry doc 02/06); S52 HLZ STATEMENT OBJ BURNHAM (24 August 2010) (Inquiry doc 02/07).
15 Estimates vary, but the party probably landed about a kilometre from their planned location.
16 “Collateral damage” was a reference to effects on civilians or civilian structures/buildings.
17 We use the term “engagement” to mean a burst or series of near-continuous bursts of fire at a target or group of targets. A single engagement may (and on some occasions did) involve simultaneous firing by several different aircraft.
18 This exchange is recorded in a transcript attached to the AR 15-6 Report: “Exhibit 18” in Inquiry doc: FOIA release, above n 3, at 63.
19 This is shown and/or referred to in the AR 15-6 Report: “Exhibits 16–18” in Inquiry doc: FOIA release, above n 3, at 61–63.
22 “Exhibit 18” in Inquiry doc: FOIA release, above n 3, at 63. One of the air assets is recorded saying there are about 20 people now at the building the target is moving towards. It is then noted on the transcript in brackets that there are “possibly more personnel coming out of the building – same building that rounds just landed on top of”.
25 Explosives were generally used to create a new entry point after a call out to which there was no response. Explosives were used because the call out would have warned any occupants of the impending entry and they could have set up booby traps or ambushes behind doors and such like.
26 A flashbang is a non-lethal, grenade-like explosive that causes a loud noise, a flash of light and a sudden change in air pressure. It is used to disorient any people in close proximity.
27 EOD INCIDENT REPORT-OBJECTIVE BURNHAM (23 August 2010) (Inquiry doc 09/11).
28 The drone footage does not show the man until he was part way up the ridge, so does not show exactly where he came from.
29 This does not mean the man was not carrying a weapon. Our imagery and geospatial analyst said that it was possible that he was carrying a long arm weapon slung over his shoulder. Given the terrain in which he was killed and the distance he fell, any weapon he was carrying (if there was one) may not have been found. We discuss the circumstances of the man’s death further in chapter 5.
30 Based on what Qari Miraj told Mr Stephenson, it appears that this person was Qari Miraj, who said he hid in the bushes with his bodyguard.
31 The operations summary (OPSUM) for Operation Burnham refers to shots being heard from A3 at 1.54am, OP-RAHBARI-OBJ-BURNHAM-OPSUM (22 August 2010) (Inquiry doc 02/14). We consider that this is a reference to the shotgun being used to gain entry.
33 One NZDF document indicates a RPG motor was also found in A3 (OBJ BURNHAM POST OP TGT SKETCHUP RENDERS (Inquiry doc 11/30) at 6), but this does not appear in the EOD report (Inquiry doc 09/11, above n 27) and was not corroborated by other evidence. The document also indicates a mobile phone was found at A3.
34 OP SUMMARY (Inquiry doc 02/03) at 1–2. This was confirmed by oral evidence. See also chapter 6 at [110](c)–[113].
38 This is shown clearly on the drone footage and in a Battle Damage Assessment image released by the United States under the Freedom of Information Act along with the AR 15-6 Report. This image shows A3 with the roof over two rooms at the southern end of the building missing, although the walls remained intact (see “STORYBOARD CLOSE-UP 2” in Inquiry doc: FOIA release, above n 3, at 79).
39 Nicky Hager and Jon Stephenson Hit & Run: The New Zealand SAS in Afghanistan and the meaning of honour (Potton & Burton, Nelson, 2017) at 68.
40 The RPG launcher was retained and taken back to Camp Warehouse, and then to New Zealand for educational purposes. See: Letter from Air Commodore Woods to [redacted] re “OIA Request 2018-3234” (27 September 2018) New Zealand Defence Force <www.nzdf.mil.nz>.
41 A1 was an L-shaped building. The weapons were stacked outside the building in the corner created by the L, probably about five or so metres from the wall. We were told that the weapon pile was placed in this way to protect the ground troops from the explosion and any fragmentation of the munitions.
42 The Troop Commander later expressed some doubt about the timing of this in correspondence to the Inquiry. However, taking all the evidence together it appears most likely these events occurred around the time of the detonation. In any event, nothing turns on the exact timing of this interaction.
43 Hager and Stephenson, above n 39, states a large piece of cloth was left behind after the operation, which included on it a phone number to call for assistance in the event of civilian casualties. The book says villagers called the number but no assistance was received: at 69. The Inquiry was provided with a copy of the posters left behind at the scene (see GIROA-ISAF Partnering Operation IO Message (Inquiry doc 09/26)). The posters did not contain a phone number or instructions for seeking assistance – they simply explained the purpose of the operation and apologised for any disturbance.
45 4x contacts during obj BURNHAM (Inquiry doc 02/08) at [4]: “NE direction of route confirmed to take pers above [friendly forces] A1 and overwatch of HLZ. Progress meant suspected INS would arrive in position prior to exfil.”
46 This is referred to in Hit & Run (Hager and Stephenson, above n 39, at 43) and we are satisfied on the basis of witness evidence that it did occur. The fact that a pistol was lost during the operation is also mentioned in NZPRT Meeting Record (Inquiry doc 10/19) at 2.
47 The Chinooks had to leave the area before daybreak.
48 Morning Report “Mapp: SAS not guilty of war crimes, operation a ‘fiasco’” Radio New Zealand (online ed, 23 March 2017) <www.rnz.co.nz>.
50 “Findings and Recommendations” at 6, in Inquiry doc: FOIA release, above n 3, at 11. The AR 15-6 Report went on to explain after the passage quoted, however, that the air assets could have done some things better.
53 NZSAS (TF81) OPERATIONS IN BAGHLAN PROVINCE AUGUST AND SEPTEMBER 2010 (10 December 2010) (Inquiry doc 09/12).
54 CRU AND NZSAS OPERATIONS IN BAGHLAN PROVINCE AUGUST AND SEPTEMBER 2010 (13 December 2010) (Inquiry doc 09/27).
55 “Dot point brief for VCDF” (22 March 2017) Inquiry Bundle for Public Hearing Module 4 – Part 2 (Public Hearing Module 4, 16 September 2019) at 261.
56 Cable re Visit of Minister of Defence and CDF to Afghanistan 18 022 August [2010] – Detainees (2 September 2010) (Inquiry doc 05/36) at [2].
59 100822-ISAF-SOF-NSI-TF81 OP RAHBARI OBJ BURNHAM CONOPS (Inquiry doc 06/06) at 13.
60 Evidence of Sir Jerry Mateparae, Transcript of Proceedings, Public Hearing Module 4 (16 September 2019) at 54.
61 NZDF Memorandum for New Zealand Defence Force on the public and unclassified account of events at issue in Government Inquiry into Operation Burnham Submission to Inquiry (7 November 2018) at 6.
63 Task Force 81-OpWatea-SITREP 40-10 (3 October 2010) (Inquiry doc 10/18).
65 Untitled-Nova 3 (3 October 2010) (Inquiry doc 10/17).
67 10 November 2010 is the earliest date after Operation Burnham on which commercially available satellite imagery shows a clear view of the valley.
68 DSO-CDF Brief Op Watea 05 Oct 2010 (5 October 2010) (Inquiry doc 10/40) at 12.
69 See, for example, 2010-10-08 Baghlan Atmospherics (Inquiry doc 06/03) at 2.
71 At 38.
72 At 40.
73 At 48–50. Note that Hit & Run uses the spelling “Deen Mohammad”.
75 Note that the fire damage that A3 sustained on Operation Burnham was repaired before Operation Nova on 3 October 2010. 11 November 2010 was the date of the first available commercial satellite imagery following Operation Burnham.
Last modified: